VENTILATION TIPS
On this page you will find information on how to ventilate a damp space such as a bathroom, toilet, cellar or kitchen.
On this page you will find information on how to ventilate a damp space such as a bathroom, toilet, cellar or kitchen.
Use our simple configurator. In only 4 steps, you can calculate the fan capacity your space needs. First specify the space, and then its dimensions. The result is displayed immediately, expressed in m³/h. You will find these values on the product pages of our fans under the heading ‘Technical information’.
[CP_CALCULATED_FIELDS id=”6″]
Ventilation is a hot topic at the moment. A well-ventilated home is important at all times. Airing your house briefly has little or no effect. After only half an hour all the fresh air will already be gone! There will be much less moisture and dust in a well ventilated house.
In our quest for a climate-neutral house, all areas are increasingly better insulated. This is great, of course, but makes proper ventilation all the more important. Your family, your pets and houseplants all produce moisture in the house every day. Fumes from cooking, smoke and allergy-causing substances also contaminate the air in our living space.
The terms ‘dust mite’ and ‘mould’ sound dirty, and they are. People with asthma-like symptoms can suffer a lot from them. However, a poorly ventilated space can cause health problems such as shortness of breath, coughing, headaches or even chronic colds in anyone.
Permanent ventilation can be provided by ventilation grilles in or near windows and doors. Extra ventilation may be required while cooking, showering and sleeping. Consider, for example, central extraction or targeted ventilation by means of fans, in bathrooms and elsewhere.
Source: Government of the Netherlands

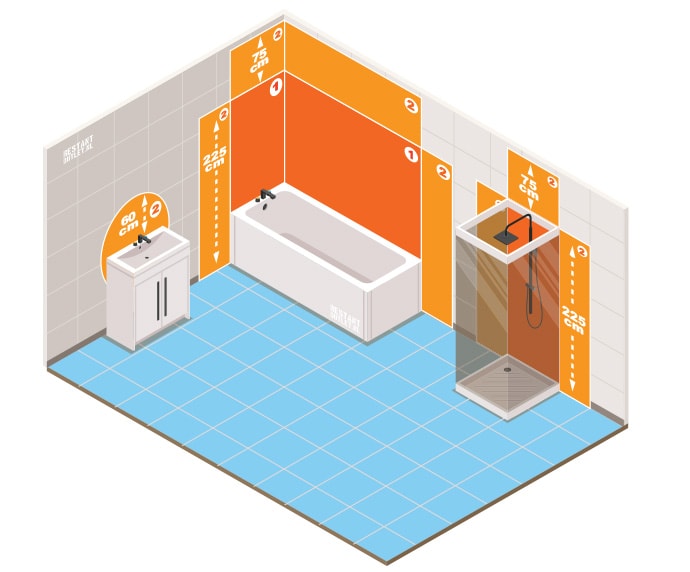
Water and electricity don’t go well together. In the NEN-1010 standard, damp spaces are divided into zones. Fans have a certain IP Rating. The minimum IP Rating that must be met to allow for installation is defined for each zone. This way you can install the right fan with confidence:
All our fans are suitable for this zone.
These bathroom fans must be connected to a light switch and turn on when the light switch is turned on. The fan then switches off immediately when the light switch is turned off. A few examples:
The run-on timer ensures that the bathroom fan continues to run for a while after it has been switched off, so that the room is fully ventilated. The duration of this continued operation can be set between 2 and 30 minutes by means of a small set screw (potentiometer). Note that for this function the fan must always be connected with a permanent power wire (phase wire = brown).
These bathroom fans are equipped with an extra quiet motor. The difference is really noticeable! Ideal for bathrooms or toilets if you don’t want to be bothered by excessive exhaust noise.
A non-return valve prevents cold air (draft) from entering your home through the ventilation duct. The non-return valve can be ordered optionally with the fans. The fans are designed in such a way that the non-return valve can be mounted neatly and very simply. Please note that this item cannot be combined with the iFAN and Louvre in-line tube fans.
A non-return valve prevents cold air (draft) from entering your home through the ventilation duct. The non-return valve can be ordered optionally with the fans. The fans are designed in such a way that the non-return valve can be mounted neatly and very simply. Please note that this item cannot be combined with the iFAN and Louvre in-line tube fans.
A humidity sensor, also called a hygrostat, ensures that a bathroom fan switches on automatically as soon as the humidity becomes too high. This is ideal for in the bathroom because the fan only stops ventilating when the air has been stripped of all moisture. The sensitivity of this sensor can be adjusted with a set screw (potentiometer). In the lowest setting, the fan will continue to run frequently, if not always. Practice often shows that the middle position is often the best setting.
Ideally, the fan starts working as soon as someone enters the room. Handy for the bathroom, but of course also for the toilet.
If you know a little about electrical systems, it shouldn’t be too complicated! There are a few things to keep in mind. For example, a standard on/off bathroom fan has a different wiring diagram than a bathroom fan with humidity sensor or timer.
The diagrams differ depending on the type of fan you have. There are two categories:


Please note! A bathroom fan with motion sensor cannot be connected to a light switch. After all, it needs a permanent power supply and the motion sensor itself has the function of a switch.
(View our range here)
In this situation you need a fan with humidity sensor or motion sensor. Only two wires are needed to connect the fan: a phase wire (brown) and a neutral wire (blue) This type of fan requires a permanent power supply. It takes care of the switching itself: either by means of the humidity sensor or by means of the motion sensor (PIR sensor). 
Wiring diagram of a fan with humidity sensor / motion sensor, without switch.